Because of this, finding the right file or folder in Linux when you need it becomes a challenge. In this article, you’ll learn how to use the Linux FIND command, and we’re going to give you all the examples we can.
Linux FIND Command Syntax
Syntax refers to how words, or commands, are put together. Just as a normal sentence can become nonsense by just shuffling the words, commands can fail if they’re not used in the proper syntax. find [path] [conditions] [actions] Here’s what that means: find – initiates the Find utility in Linux path – where to look conditions – arguments you want to apply to the search actions – what you want to do with the results A simple example using all three looks like: find . -name file-sample.rtf -print As you guessed, this will find the file name file-sample.rtf. The period (.) path tells find to look in the current directory and any directories inside it. The -name condition tells find to get the file with that specific name. The -print action tells FIND to show the results on the screen. The period and -print are defaults for the find command. So it will still do the same thing if you don’t use them. So, find -name file-sample.rtf will give you the same results.
Linux FIND In Another Directory
You can search in a directory different from the one you’re in. Just insert the path to the directory after FIND. If you’re at the root and you know the file is somewhere in the home/user directory you would use: find home/user -name file-sample.rtf It’s still a recursive search, so it will go through every directory under user.
Linux FIND Search Multiple Directories
If you wanted to search in several directories at once, just list them in the command, separated by a space. find /lib /var /bin -name file-sample.rtf
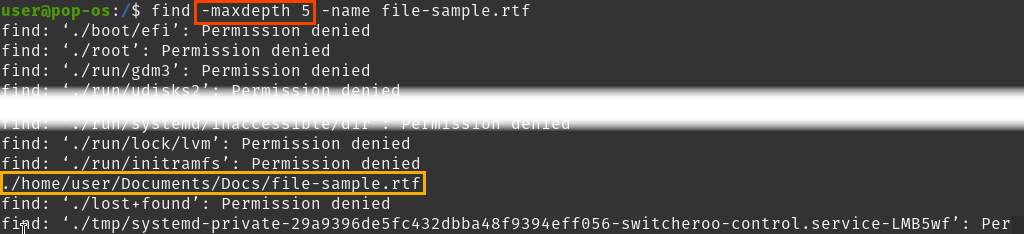
Linux FIND with No Recursion or Limiting Recursion
If you used the FIND command above at the root level, it would look through every directory on the system. So if you want to stick to just the current directory, use the -maxdepth option. The number after -maxdepth tells Find how deep to go before stopping. Using -maxdepth 1 means just this directory. find -name file-sample.rtf -maxdepth 1 Using -maxdepth 2 or greater number means to go that many levels deeper. find -maxdepth 5 -name file-sample.rtf
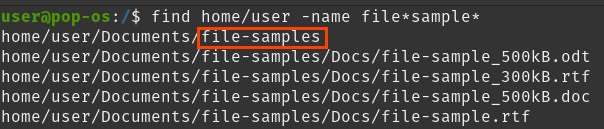
Linux FIND Wildcard Example
The FIND command uses the asterisk () as a wildcard. Use it for any part of the name that you’re unsure of. It can be used more than once in the name. Without the file type as part of the file name, results will also include directories that match. find home/user -name filesample*
Linux FIND by Type Example
To only search for a file or a directory, use the -type option and the appropriate descriptor. There’s a few, but the file and directory ones are most common: f – file d – directory b – block device c – character device l – symbolic link s – socket find home/user -name filesample -type d Linux FIND Case Insensitive Example Unlike Windows, Linux cares about whether a letter is capital or lowercase. So if you want it to search for both File-Sample.rtf and file-sample.rtf, use the -iname option. find home/user -iname File-Sample.rtf
Linux FIND Several Files Example
Let’s say you wanted to find the .rtf and .html versions of a file. That can be done in one command using the -o (or) operator. In some distros, you may need to put the names inside of brackets, like ( -name file-sample.rtf -o -name file-sample.html ). find home/user -name file-sample.rtf -o -name file-sample.html
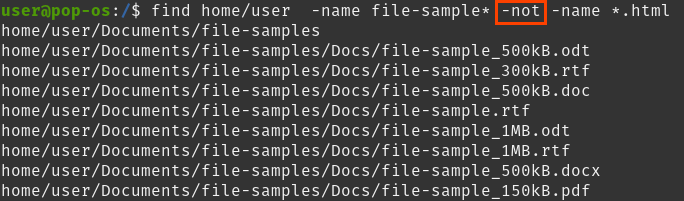
Linux FIND Files That Don’t Match a Name
Perhaps you know there’s the .html version of a file, but not if there are others. You could filter the .html version out of the search using the -not option. find home/user -name file-sample* -not -name *.html
Linux FIND Without Error Results
In the find with no recursion example, notice that it listed every directory that it couldn’t search in and the correct result. That’s annoying. Let’s stop it from showing all those “Permission denied” directories. Combine it with another Linux terminal command, grep. You can also use Find with grep to find files with specific words in them. find -maxdepth 5 -name file-sample.rtf 2>&1 | grep -v “Permission denied” Let’s break down 2>&1. 2 – represents stderr which is short for standard errors output. 1 – represents stdout which is short for standard output
– means to redirect whatever output is to the left of it to whatever is to the right of it. & – means to put together. So 2>&1 means take the standard errors and redirect them, and then put them together with the standard output into one output. Now lets look at | grep -v “Permission denied”. | (called a pipe) – tells Linux to feed the results of whatever is to the left of it to whatever is to its right. It’s being fed to the grep command. grep – is a text search utility. -v – tells grep to search for anything that doesn’t match text to the left of the -v. In this case, it’s telling grep to only find anything that doesn’t contain the text or string, “Permission denied.” So grep will only show you the results you’re looking for and any errors that don’t match “Permission denied.”
Linux FIND by Permissions Example
To use this well, you need to learn Linux permissions. The example files all have the permissions 664, except one with the permissions 775. Use the -perm option to find it. find Documents/ -name file-sample* -type f -perm 775
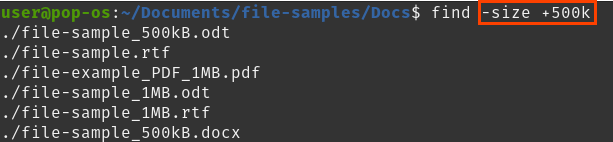
Linux FIND by Size Example
Finding files by size is handy for getting those huge files filling up your hard drive. Use the -size option, the size desired, and one of the following suffixes. If no suffix is used, -size defaults to b. To find files equal to and larger than a certain size, put the plus-sign (+) in front of the size. M – Megabytes G – Gigabytes k – Kilobytes b – blocks (512 bytes – default) c – bytes w – words (two bytes together) find -size +500k
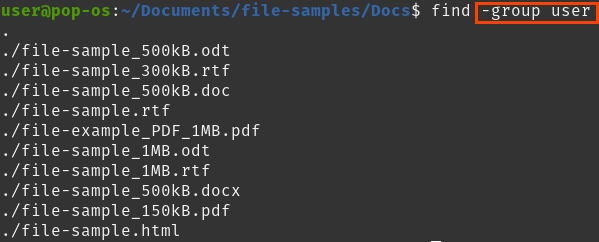
Linux FIND by Owner
There are two ways to find files by owner. One is by an owner’s user name, and the other is by the user’s group. To find by username, use the -user option, followed by the username. To find by user group, use -group followed by the group name.. find -user groupname or find -user username
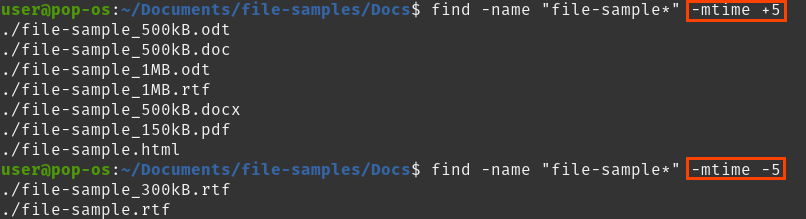
Linux FIND Files by Last Modified Example
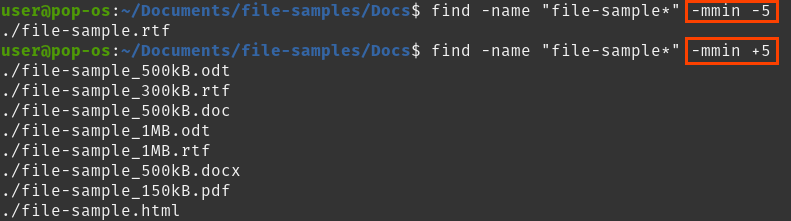
To find files that were modified, or edited, in the last X number of days, use -mtime followed by a number. Putting a minus sign (–) in front of the number will find anything altered within that many days before now. A plus sign (+) means within that many days before now. find -name “file-sample*” -mtime +5 (greater than 5 days ago) find -name “file-sample*” -mtime -5 (less than 5 days ago) To find by last modified in minutes, use the option -mmin followed by the number of minutes. Use the + and – like above. find -name “file-sample*” -mmin -5 find -name “file-sample*” -mmin +5
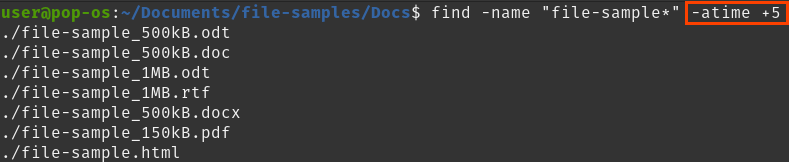
Linux FIND Files by Last Accessed TIme Example
The option used to find files based on when they were last opened is -atime for days and -amin for minutes. Follow it with the number of days or minutes to go back and use the + and – sign as greater than and less than. find -name “file-sample*” -atime -5 find -name “file-sample* -amin -5
Combine FIND with Other Linux Commands
There’s one example above of using find with the grep command, and you can use it with many others. You can see that using find and other commands can be very powerful and a huge timesaver. Imagine having to delete a bunch of a particular type of file. Instead of searching around in the file explorer, just craft the right command, and it’s done in seconds. How will you use the find command now?